We spent today making some very simple gifts for Valentine's Day. The gift pictured above is a paper mache heart for my mum. It will be a present from Toots.
This actually turned out to be pretty quick to finish, aside from the drying time it only took around 30 minutes, which is a pity because I'd planned on keeping a slightly bored preschooler occupied with this for most of the afternoon. Ah well, c'est la vie. It just goes to show, when kids are involved, plan, plan and plan some more.
Bear in mind that it is messy so its best to throw down an old tablecloth or sheet to catch any drips.

You'll need to start off with some old newspapers, magazines, catalogues, just whatever you happen to have handy.

The newspapers I used were copies of the local paper, so about the size of an average magazine. Take two sheets of paper and roll up into a ball then cover with tape. I used decorators tape because I had quite a lot handy but any tape could be used. Repeat this process so that you have two balls.

Take one sheet of newspaper and fold in half lengthwise. Place one ball of paper close to the side of the length of paper and roll up so that you have a tube of paper with the ball close to one end.

Fold the ends of paper in and tape to the ball, cover the rounded end of the tube with tape to give it a slightly smoother appearance and make sure its well secured.

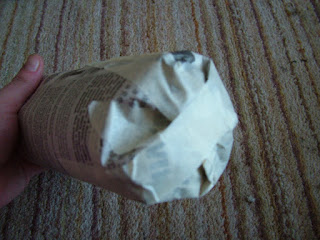
You'll end up with a basic torpedo shape like the one above.

Flatten the empty end of the tube and fold each side of the paper in towards the middle to make a point and completely cover with tape.

Make another teardrop shape the same as the first and one smaller one, beginning with half a sheet of newspaper for the ball. This should help give the right size for the small piece.

Tape all three pieces together with the smaller piece in the middle and again completely cover with tape, add some scrunched up strips of paper if you think there are any obviously "holes" in the heart shape or any sunken sections which will be difficult to fill out later.

Next comes the messy bit. You'll need to shred some newspaper and get some glue. I used 2 parts PVA and 1 part water. You can also make a very good paste using 1 part flour to 2 parts water. Start to completely cover the heart shape with strips of newspaper dipped in the paste. You'll need to build up about 4 or 5 layers.

I then added a final layer of pink tissue paper. This is necessary I just had it in the craft box and didn't realise until the last minute that I didn't have any pink paint left or even any red paint so I couldn't make pink.
You'll notice from the first photo that i changed my mind again and recovered the heart in a darker shade of pink tissue paper.
And then of course once the kids are in bed you can some fun all by yourself and go slightly nuts with the embellishments.
I have an absolute ton of buttons so I super glued a few on there, as you can see and then I cut some hearts and circles from some offcuts of craft paper I had in the box, placed them together, added yet another button and sewed them together with embroidery thread before gluing them on in the same way.
And all the craft supplies have been gathered over the years from my local £ shop (dollar store equivalent) and stockpiled.

For more great tips, crafts, recipes and loads more head on over to Rocks in my Dryer. And if you're interested I also have a great bread recipe posted today. Its also linked over at Rocks in my Dryer and I've listed some delicious additions to the main recipe.

Looks good! What a cool idea, and a great way to recycle newspaper!
ReplyDeletesuoer cute! I'm always looking for ways to recycle, great idea!
ReplyDeleteThanks for checking out the cinnamon hearts. For spicy ones use HOT taco seasoning.
ReplyDeletereally cute idea! I was wondering how you came up with the heart shape. Great tutorial!
ReplyDeleteToni
What a cute heart! I love the colors and the embellishments that give it dimension. Thanks for sharing with us this idea, and thank you for visiting my blog today and leaving a comment. Have a Happy Valentine's Day! ~Arleen
ReplyDelete