Showing posts with label cheap and cheerful. Show all posts

Tutorial - Homemade Poi for Kids

At the very real risk of being labelled internet wide as a terrible mummy, I'm going to give you a tutorial on how to make your kids homemade poi.

Poi are used often in performance arts and a friend of mine got me hooked on them years ago but, as with most things in life, where it can be very difficult for an adult to learn to use them kids master them in a matter of days.

I still try as often as the weather permits to get into the garden with a set because using poi is a fantastic form of exercise and is also great for developing coordination, balance and grace, three things which I sometimes lack. I also found that when I worked as a secretary, spending hours chained to a pc typing left me with very stiff, sore wrists and poi swinging helped to ease and soften the muscles and get rid of the cramps.

So, to make a set of poi for you kids (or for yourself) you'll need the following;


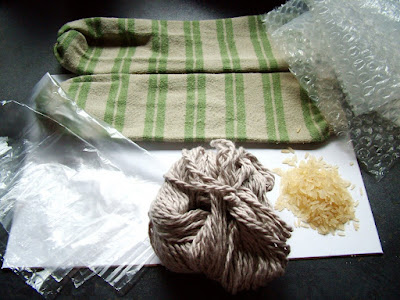
A pair of old socks (kids knee length or regular adult size ankle length will do)*
Two sandwich bags or small cheapy plastic bags.
60g of rice
Some bubble wrap (old towelling or fleece will work too)
Elastic bands or regular kitchen string.

The first thing you need to do is take a measurement. If these are for a child take a measurement from their underarm to their wrist, for an adult measure from the fingertips to the shoulder. If, like mine, your child doesn't fancy standing still while you take the measurement just use a well fitting coat or jumper to get the right length.

Keep a note of the measurement (mine happened to be 10 inches). Then measure out exactly 30 grams of rice into each of the two plastic bags. You do need to be precise about the weight because even a gram or two can throw off the balance.**


Then tie a knot in each bag a couple of inches away from the rice. Don't compact the rice into a ball and tie the knot close to it, the point is to allow the rice to move around as freely as possible inside the bag.


Next take a square of bubble wrap or soft cloth and pinch the four corners together around the bag of rice, again not compacting the rice in any way. My square of bubble wrap was 6in X 6in.


And then place the bag in the toe of the sock.


Hold the sock in your hand and give it a good shake to make sure the bag of rice is well seated in the bottom of the sock.


Then taking an elastic band or a piece of string wrap or tie it around the sock about an inch above the rice bag.


You can see that there is still plenty of give in the ball end of the sock.


Next take the poi along with your measurement. Its easier to set a ruler or tape measure down, rather than trying to eyeball it.


And stretch the sock out to its fullest and make a note of the measurement on the sock (easy with mine because of the stripes). You really need to stretch the sock as far as it will go because it will stretch when spun and you don't want it getting a couple of inches longer all of a sudden mid flight (trust me, learnt that lesson the hard way).


Then just tie a knot at the measurement mark when stretched and you're done. Once the sock has relaxed back to its original length it will look very short, but it will stretch to the full length at some point during spinning so it really is better to be safe with this one.


Repeat the steps again for the second poi and you're ready to go.


Start by learning to spin the poi forwards, once you're completely comfortable with that then begin to spin them backwards.

You can then move on to split time swinging, chasing the sun, the windmill (which I totally rock btw) and loads and loads more.

The trick to teaching kids to swing poi is to teach them to keep their arms straight. That's it, it really is that simple. If you follow the instructions above and your child keeps their arms straight regardless of where their arms are positioned, its quite difficult for them to hit themselves with the poi. You also want the child to hold the knot while spinning the poi. You can also make sure the knot is pulled tight and then cut away any excess fabric.

*I didn't use a pair of socks because I happened to have a pair of Toots old skater sleeves lying around. It meant that I had to sew one end of the sleeves closed, but if you use socks you don't have to bother with this step and don't worry that the heel makes them look a funny shape, they still work the same way and swing straight.

**There are some instructions around which suggest using crumpled up plastic bags or cotton wool to stuff the ball end. Please feel free to do this if the thought of rice or lentils concerns you. I've tried a few different methods and have just found that the rice works best. The poi seem to work better and are less likely to go off track or get caught by the wind when there is a bit of weight at the end of the poi.


What I do it add the weight, but I make sure that it is "soft weight". Made this way, even if the poi does happen to hit you the weight isn't solid so it gives and flattens. Toots and I have hit ourselves with these a few times but never hurt or even bruised ourselves with them.

Blown Away

Sometimes I'm just amazed at the generosity of others.

I finally signed up for Freecycle yesterday at around lunch time. I've been meaning to do it for a while but to be honest I either kept forgetting to do or I was caught up in something else.

But there has been some chat about it over on Folksy lately so I figured it couldn't hurt to give it a try.

I offered a large artist's easel which the husband made for me in another life. I'm a bit of a hobby nut so obviously a flitted through painting for a little while. I'm rubbish so the only painting I do these days is with a roller and a tin of vinyl silk.

I had a quick look through the listings and once I was sure that one wasn't already listed I placed a "want" for a sewing machine. I said that I didn't mind if it didn't work and needed repairs because I'd happily consider anything.

I'm a bit handy with electrics and I can generally fix a fair amount of small problems, however the husband is very good with electrics so I figured if I couldn't get something to work, he could and if he couldn't then it maybe wasn't something that would be economical to fix.

Anyway, I placed the listing at lunch times yesterday and before the husband even arrived home from work I had a local artist lined up to collect the easel tonight and before I went to bed a lovely woman contacted me to offer her Singer sewing machine. She said that it had served her well for years, but she went to use the machine it "popped" so she packed it up with the intention of having it looked at and her daughter went out and bout her a new one.

"Popping" electrics is usually a good thing, best case scenario the machine has a blown fuse, worst case scenario is that some other part of the machine has shorted out causing the fuse to blow but either way it'll be a quick job to check and see which it is and then decide if the later is true whether it's worth having it fixed.

So fingers crossed I should soon have a functioning sewing machine.

If you don't already use Freecycle, you should definitely consider it. Bear in mind that we have big stores here now apparently dedicated to keeping serviceable and useful items out of landfill, however those stores scavenge their stock from local charity shops for pennies and in some cases even landfill. The items are cleaned up, a sometimes hefty price tag is slapped on and the owner makes a huge profit. Wouldn't you rather see the things you no longer need go to a good home with someone who genuinely needs it but maybe can't afford to pay those hefty prices.

And a lot of the time it can even be beneficial to you to list certain things. Someone mentioned on Folksy that she listed a quantity of flag stones from her garden to see if anyone was interested. Someone replied and then arranged to call at her house, lift the flag stones and take them away. The way they saw it, it was a bit of hard work for free flag stones which they needed and she was happy too because she didn't have to lift the heavy flags by herself and then pay her local Council to take them away for her.

Give it a go, there are local groups now all over the UK and Ireland, you might to find exactly what you're after or at the very least make a bit of extra room on the garage.

WFMW - Frugal Tips

I'm just back from the dentist. Thankfully all the work is finished now because I feel like an elephant has jumped all over my face.

It'll be fin later once the numbness wears off but for the minute it feels like both my cheeks are really swollen and I imagine I look like Pob or Buzz Lightyear.

I can't complain really. All in told I've had about £2,000 worth or work done completely free of charge, yet another benefit of being a SAHM.

Anyway, today's Works for me Wednesday is a themed edition. Best frugal tip.

I've loads, most of which I do now out of habit so when I'm asked what I do to save money usually my mind goes completely blank.

Still I'm sure I can manage a few.

Children

Buy second hand clothes where possible. Kids grow so quickly that it would surprise you just how many brand new clothes, still with the labels attached or worn but in perfect condition clothes you will find in your local charity shops. Also consider buying in advance, if you spot a beautiful winter coat that won't fit them until next year, buts it an absolute bargain, buy it and store it.

If your own kid's clothes are in less than wearable condition when they're finished with them because of rips or tears or whatever, salvage the buttons and any cute patches or appliques before using the remaining cloth as rags or cleaning clothes. Kids are forever losing buttons off clothes and quite a lot of the time you can replace it with one from your stash or cover a little worn patch or hole in the knee of their jeans with one of those little appliques.

Limit day trips for little ones to free places such as the beach or forest, some museums also have "free" days (but please do leave a small donation) and pack a lunch from home when you're going on any trips out with the kids. Have you seen how excited a four year can get when allowed to play with your wooden spoons. They don't need all that paid for entertainment, besides an over stimulated child is a miserable child come bed time.

Learn to knit and pick up a few basic sewing skills and you'll be able to alter your kid's clothes to get an extra season out of them. Trousers getting a little short in the leg but still plenty of room in the waist, turn them into a skirt or shorts. And how many pairs of mittens, scarves and hats does your child lose throughout the course of a school year? These are all very simple things to knit which you can work on in your spare moments (?) so that you have a stash ready for emergencies.

Household

Make your own household cleaners using bicarb, vinegar, lemon juice and salt. I usually just add a couple of tablespoons of cheap dish soap and roughly the same amount of vinegar to a large spray bottle and fill with water. It hasn't failed me yet. But do bear in mind that buying a huge bag of lemons out of season to clean your home isn't frugal, its green but it ain't frugal.

One of the higher ups at Barclay's Bank was once quoted as saying that he would never consider having a Barclay card because of the high charges. Now that guy was being very well paid by Barclay's and if he isn't brand loyal why should you be. Shop around, make sure you're getting the best deal and on larger items always ask for a discount, especially if you plan on paying cash. Everybody gets this idea that haggling is limited to market stalls but I don't think I've ever paid full price for anything and I've saved a hell of a lot over the years. £100 off our bed, £310 off our kitchen appliances isn't anything to be sniffed at.

Food

If you happen to have the freezer space, bulk buy when the opportunity comes up. Throw a few £££ aside somewhere when you have it so that when you spot a good offer on meat or berries who can stock up without putting a dent in that week's budget.

Learn to make jams, chutneys and relish so that you can take advantage of a glut of produce such as strawberries, raspberries or tomatoes to name a few. Also if you happen to have a "pick you own" farm close buy pack the kids up and head out. You'll get a cheap day out in the sunshine, the kids will fill their bellies with good things and learn where food comes from and at the end of the day you'll have a mountain of lovely fresh fruit and veg to take home.

Use dried beans instead of the more expensive tinned variety. Yes they're more convenient in tins, but they tend to have virtually no texture left whatsoever. Take a bit of time at the weekend and boil up a huge pot of dried beans, whichever ones you tend to use the most often, once they're cooked rinse with plenty of cold water from the tap and then divide into sandwich bags and freeze for later use. You can even use them straight from the freezer, just allow ten or so minutes extra cooking time and you can do the same thing with rice for quicker meals, just very slightly under cook the rice, separate into bags, add a tablespoon or two of water to each bag and freeze. when you need them just open a corner of the ziplock bag and microwave from frozen for 2 or 3 minutes for perfect fluffy rice every time.

Bake your own bread. There really isn't anything to learn, bread is one of the easiest things in the world to make. Even a bad loaf can be whizzed in the processor and kept for breadcrumbs.

Easy Craft for Kids - The Rain Stick

Rain sticks are a great, easy and cheap kid's craft project.

You'll need to gather together the following for a basic rain stick;

Cardboard tube
Scrapbook paper or wrapping paper.
Sticky tape
Scissors
a piece of cardboard
rice or dried lentils


Start by cutting two strips of cardboard and two discs of card roughly the same size as the ends of your tube. The strips need to fit inside your cardboard tube, mine are about an inch wide. Concertina the strips of cardboard.


Place one card circle over the end of the tube and tape it firmly in place.


Turn the tube over and push the two strips of card into the tube and pour in the rice or lentils (the bigger the grains the bigger the "rain")


Place the other card circle over the open end and tape in place to close the tube.


Then cover the entire tube with pretty paper.


Fold the paper in over the ends and tape in place. Mine came up a little short. That's what I get for being too lazy to cut the tube down to fit the paper.


I had some craft foam stickers so I covered up the raggedy ends.


And that's you finished. Except we all know I'm all about the embellishments. While Toots busied herself covering the rain stick in balloon stickers, I made a little pompom wrist strap.

I threaded felt pompoms on to a length of embroidery thread using all six strands and then tied the two ends together.


I then threaded the ends of embroidery thread under a fold in the paper at one end of the tube and taped over it, adding a few feather to hold everything in place and covered up any little tears in the paper.


Then you're finished. And hopefully you have a happy child into the bargain.


If you want (or need, don't worry you're in understanding company) a great craft fix head over to Make and Tell Monday at The 6 o'clock Stitch.

Recycleable - Paper Doll House with Update

I originally posted this tutorial at the start of the year when the weather was miserable and I needed a quick fix for a bored preschooler. It seems the idea went down well and I wanted to post it again in honour of Kristen's "Best Of Theme". I have updated the tutorial at the end of the post and if you want to jump straight to the update, please feel free to do so

We were all set this morning, coats, gloves and hats on and ready to head out the door until...

Snow...and rain...and icy winds...and...no

So back inside and now I have a three year old who was desperately looking forward to a walk around the town this morning,

Because this morning we were supposed to be going to get her some new ballet pumps.

Ah well, such is life I guess. I'll measure her feet and run down tomorrow while she's with Nana, come hell or high water.

So I needed something to take her mind off the fact that she still wanted to go out regardless of the weather.

Hmm, crafts with nothing planned.

A paper doll house.

All you need to complete this very simple project are;
  • 2 pieces of stiff card (or a cardbox box will do).
  • A glue stick (or PVA or Mod Podge, whatever's within reaching distance)
  • Some sharp scissors (for you)
  • And the Ikea catalogue (or home inspiration magazines like Ideal Home).

You need to have a quick flick through the catalogue or magazines and tear out any pages with a room which pretty much covers the majority of the page (its easier to manage this with the Ikea book trust me, but then beautiful glossies don't have huge prices printed in the middle of the kitchen, so). Then with the scissors cut a very narrow slot halfway along the long side of the card and halfway through the card. Slot the two pieces together to look like this.


Then you want to give the three year old a glue stick and swan off into the kitchen to make a cup of coffee. Now you'll need a damp sponge to quickly sponge the (hopefully) still wet glue off the carpet because you weren't intelligent enough to put a mat or drop cloth down first.

Or if you're that way inclined you can sit and watch to make sure she "stays within the lines".


It's much easier if you keep the two pieces of card slotted together and then lie the whole thing flat on the floor, that way all you have to do is make sure that the magazine pages you stick to the two facing sides are both of a kitchen, or bedroom or whatever.

Like this.

Carry on around all four sides (you'll need eight magazine pages in total) and it should wind up looking something like this.


Doesn;t she looked pleased with herself. I cut two small slots near the corners at each side of the "kitchen" and strung a length of silver cord across, before hanging up a little t-shirt and trousers I cut from some old fabric. I'd picked up those tiny clothes pegs to use for hanging cards at Christmas and I've been trying to think of something else to use them for.

If you're feeling particular inspired and creative you could always colour the pieces of card yourself, then cut out individual pieces of furniture, chairs lamps that kind of thing and have fun designing your very own rooms.

I'd love to know if anyone does this their child.

For more great WFMW tips and ideas, head over to We are THAT Family
.

Update

The paper doll house went down so well in our house (it has become Toots "go to" toy) that we decided to make it more of a permanent fixture. We are still in the process of decorating her house but basically we replaced the pieces of cardboard with sheets of balsa wood. You could also use thin sheets of plywood or fibreboard (just make sure to seal all the cut edges and wear a dust mask while cutting). Best of all we're finally using up all the paint and wallpaper leftover from decorating our own home.

Oh yes, we're making her a mini version of our house, so she'll be able to play in her bedroom, in her bedroom.

I've wanted a doll's house for Toots for a long time now but just couldn't bear to part with around £100 to buy something sturdy enough to l ast, plus some of those things are a fair size and take up a lot of space while not in use. The real beauty of this house is that you can simply slide the pieces apart and slip them in under her bed.

Now THAT definitely works for me.


I'm also linking this post to the 6 o'clock stich's Make and Tell Monday carnival. You should head over there and check it out, there are some fantastic tutorials.

Freecycleables - Valentine Hearts Tutorial - WFMW


We spent today making some very simple gifts for Valentine's Day. The gift pictured above is a paper mache heart for my mum. It will be a present from Toots.

This actually turned out to be pretty quick to finish, aside from the drying time it only took around 30 minutes, which is a pity because I'd planned on keeping a slightly bored preschooler occupied with this for most of the afternoon. Ah well, c'est la vie. It just goes to show, when kids are involved, plan, plan and plan some more.

Bear in mind that it is messy so its best to throw down an old tablecloth or sheet to catch any drips.


You'll need to start off with some old newspapers, magazines, catalogues, just whatever you happen to have handy.


The newspapers I used were copies of the local paper, so about the size of an average magazine. Take two sheets of paper and roll up into a ball then cover with tape. I used decorators tape because I had quite a lot handy but any tape could be used. Repeat this process so that you have two balls.


Take one sheet of newspaper and fold in half lengthwise. Place one ball of paper close to the side of the length of paper and roll up so that you have a tube of paper with the ball close to one end.


Fold the ends of paper in and tape to the ball, cover the rounded end of the tube with tape to give it a slightly smoother appearance and make sure its well secured.


You'll end up with a basic torpedo shape like the one above.


Flatten the empty end of the tube and fold each side of the paper in towards the middle to make a point and completely cover with tape.


Make another teardrop shape the same as the first and one smaller one, beginning with half a sheet of newspaper for the ball. This should help give the right size for the small piece.


Tape all three pieces together with the smaller piece in the middle and again completely cover with tape, add some scrunched up strips of paper if you think there are any obviously "holes" in the heart shape or any sunken sections which will be difficult to fill out later.


Next comes the messy bit. You'll need to shred some newspaper and get some glue. I used 2 parts PVA and 1 part water. You can also make a very good paste using 1 part flour to 2 parts water. Start to completely cover the heart shape with strips of newspaper dipped in the paste. You'll need to build up about 4 or 5 layers.

I then added a final layer of pink tissue paper. This is necessary I just had it in the craft box and didn't realise until the last minute that I didn't have any pink paint left or even any red paint so I couldn't make pink.

You'll notice from the first photo that i changed my mind again and recovered the heart in a darker shade of pink tissue paper.

And then of course once the kids are in bed you can some fun all by yourself and go slightly nuts with the embellishments.

I have an absolute ton of buttons so I super glued a few on there, as you can see and then I cut some hearts and circles from some offcuts of craft paper I had in the box, placed them together, added yet another button and sewed them together with embroidery thread before gluing them on in the same way.

And all the craft supplies have been gathered over the years from my local £ shop (dollar store equivalent) and stockpiled.


For more great tips, crafts, recipes and loads more head on over to Rocks in my Dryer. And if you're interested I also have a great bread recipe posted today. Its also linked over at Rocks in my Dryer and I've listed some delicious additions to the main recipe.

Sunday Savers - 50th Post


Well it’s Sunday and my 50th post.

The following is a list of fifty (sometimes random) things I do around the house to save money. I’ll keep each thing brief because fifty things can be a lot to get through. Most of them are things almost everybody does, whether it’s to save money, or just out of habit. If you would like me to elaborate on anything in this list, just ask.

1. I only buy AAA rated appliances. I’ve learnt my lesson from past experience, not to buy anything less than this.

2. I have all my appliances repaired when they go wrong and only replace them when the repairman gets “that look” and sucks air in through his teeth.

3. I grow my own vegetables and fruit, but I’m really limited because I just can’t bring myself to fork out for a greenhouse.

4. When I see the veg on offer that I can’t grow, I buy tons of it, prepare it and freeze.

5. I cut Himself’s hair.

6. I use home dyes on my own hair and trim it.

7. I buy most if not all of my clothes from charity shops. The rest are bought on sale.

8. I knit and bake a lot of gifts and buy as little as possible.

9. We rarely drive anywhere at the minute and group all our errands together to save on petrol.

10.When we fill toot’s paddling pool to help cool down on warm days, we drop in the submersible pump when she’s finished playing and use the water to water the plants and fill the water butt.

11.I don’t buy any treat type things when I shop. Instead I bake cakes, cupcakes and cookies.

12.I also sell the cakes I bake. Not really saving money so much as making some extra money.

13.I use reconstituted milk in baked goods and can’t tell the difference although I cannot drink the stuff straight.

14.I bake my own crusty bread as well as pizza bases and rolls. I’m rubbish at everyday sandwich white. I just can’t get a recipe that works for me.

15.We only have free days out, to places like the beach, the duck pond and forests

16.When we do plan a day out, I pack a picnic and plenty to drink and leave my purse at home. That way I don’t have to worry about avoiding the temptation of hitting a restaurant on the way home or buying junk while we’re out.

17.I’ll be making my own greetings cards, at least for the rest of the year and maybe part of next year.

18.I am not brand loyal. I’ll buy whatever’s on offer.

19.I make modelling clay and finger paints for toots.

20.We eat a lot of Italian type food so I buy two huge tins of tomatoes from Makro and make two pots of sauce, one for pizza and one ragu.

21.Our home is carpeted throughout. I know wooden floor is cheaper at the outset but it’s a curse to heat these houses and in the long run wooden flooring would cost more.

22.We’ve completely insulated the whole house.

23.There are aerators on our taps and showers to reduce the amount of water we use. We don’t pay for water here yet but it’s not far away.

24. Toots now gets a shower rather than a bath.

25. We’ve reduced the flush capacity on the toilets.

26. I buy in bulk and refill smaller containers for ease of use.

27. I take shampoo, conditioner and soap out of the original squeeze bottles and put them into pump bottles so it isn’t as easy to overuse them. This makes them last twice as long.

28. I make my own cleaners from vinegar and bicarb. Toots is sensitive to dust, pollen and dog dander, so it stands to reason chemical fumes wouldn’t do her any favours.

29. We holiday at home.

30. I’ve finally worked out how much to cook so we never have leftovers.

31. To cut down on the amount of laundry I make everyone hang their towels to dry and use them again tomorrow. I do the same thing with anything like pyjamas and jeans which can be worn more than once before being washed.

32. The thermostat has been turned down and we just put on a jumper and extra blankets on the beds in the winter.

33. We have aircon but I really don’t like to use it. I blame it for a lot of common illnesses like cold and flu and I’d much rather open a window and get some fresh air in the house.

34. I put all my photos onto disk as slideshows rather than print them to save on photo paper. I only print the ones destined for frames on the walls.

35. When I’m food shopping I go with someone. That way we can take advantage of the offers on things I couldn’t use myself before the food spoiled.

36. I am a market ghost, haunting at the end of the day for the best price.

37. I have a bit of a book club on the go with some friends for anything we can’t get at the library. We take it in turns to buy a book and it gets passed around everyone before being donated to a charity shop. This means I only have to buy one out of every eight books I fancy reading.

38. I buy all my yarn in the January sales.

39. Clothes, as much as possible are lined dried. I will use the dryer sometimes. If I’m trying to get through a huge amount of laundry and the weather isn’t great I’ll use it.

40. I do have a dishwasher, but I only use it in summer. We never got round to changing the set up on the heating and therefore we can’t heat water without either heating the house as well or using the emersion which costs a fortune.

41. Himself’s the handiest bloke I know so we do all our own DIY rather than paying someone else to do it.

42. I alter our clothes. I can manage hems, buttons and taking things in but I don’t know if I could make something from scratch.

43. I’m a rate whore. I haven’t paid interest, transfer fees or set up fees on my credit card in 15 months and we hope to get it cleared within the next four or so months.

44. All the lights have now been changed to energy efficient light bulbs.

45. We don’t have magazine subscriptions. We did, but we’ve cancelled them all.

46. We don’t have any pets apart from some fish. We’re out of the house for around 11 hours a day so I don’t think it would be fair to an animal to be cooped up for so long anyway.

47. Himself and I both take packed lunches to work.

48. I wear contacts instead of glasses (although I have a spare “just in case” pair). My prescription only needs updated every four years with contacts as opposed to every two with glasses.

49. I switch all the appliances off at the wall when not in use.

50. My broadband is free because we have the basic Sky package and if I’m planning on spending the day on the laptop it gets plugged into the UPS.

Five cheap (or free) ways to occupy kids when it’s pouring outside.


Hello. My name is Leanne and I live in Northern Ireland. It rains here. Often.

It was easy enough to keep toots occupied without resorting to TV all day when she was a lot smaller. Now she has to be doing something and because she’s only three a lot of her play is still led by me and Himself.

She’s quite independent when doing certain things, but the weather this year has been awful and she tires of the same thing quickly (Don’t they all?).

So, five things for kids to so when it’s raining. Most of these are relatively easy to do and prepare. I’m not a fan of huge craft projects which take an hour just to lay everything out. Besides, we’re usually just about to head out to the beach, bucket and spade in hand, when the heavens open and I need a quick distraction.

Paper Mache – OK I know, it can be a bit messy, but it’s great for kids of all ages. Even the tiniest of toddler can manage this one without having to be too dextrous. All you need are a handful of balloons, a newspaper or magazine, some flour and water.

Get a bowl of cold water and add enough flour until it’s the consistency of white glue, tear the paper into strips about an inch wide and plonk into the bowl, inflate balloons and give one to each child and let them work away. The beauty of using the flour and water mix instead of actual glue is that when you’re trying to work with a handful of kids it isn’t a disaster if one starts eating from the bowl (it’ll happen, trust me). Plus this means that you’ll then have another planned project for another day when the balloons are dry.

Baking - I don’t this is a predominantly girly thing. I’ve yet to meet a boy who didn’t like to bake as long as he gets to eat the finished product.

The easiest recipe in the world for use when baking with kids is as follows;

One carton of kid’s yogurt or fromage frais.
One carton of caster (superfine) sugar.
One carton of vegetable oil (you can substitute this for melted margarine/butter or sunflower oil)
Three cartons of self raising flour (or plain (all purpose) flour with a teaspoon of baking powder added)
One large egg.

Scrape the yogurt out into a bowl and give the carton a quick wash and dry. Measure out the remaining ingredients starting with the dry ones and add to the bowl with the yogurt in no particular order. Let the kids mix with the wooden spoon (it doesn’t matter if it’s a bit lumpy) and then use the mixture to half fill cupcake cases.

Bake at 180C (350F) for 15-20 minutes, they’ll spring back of you press on them gently when they’re ready. When you remove them from the oven either immediately place a choccy button or two on top while they’re still hot or let them cool slightly and then serve still warm, split in half with some jam.

Play in the rain – Hey it’s there you might as well make use of it. Who can make the biggest splash that kind of thing; also worms come out when it rains, if your kids are into that. Mine is. And if it’s warm outside even though it’s raining, there’s nothing wrong with sticking on some old clothes and letting them roll in the mud, sure it’s just good clean dirt.

Painting and Drawing – but lead them in this. Next time you pass a DIY store pick up a roll of wall lining paper. It’s dirt cheap, usually recycled and quite thick. Pull out your great big roll of paper and a box of colouring pencils or crayons and ask them to draw something specific, their ideal bedroom, a theme park, the best pet in the whole wide world or just a portrait of you. This will also give you some insight into what they think about.

Musical Statues – It isn’t just for birthday parties you know. Get the music on and turn the volume up. Keep hold of the remote and hit mute, everyone has to stay completely still while the music’s off. You can add to this game as well, drop some drying cloths on the floor and say that everyone has to dance on their cloth, if you fall off when the music stops, next time you can only dance on one foot or as a penalty you have to dance with mum for five minutes.

I know hardly and extensive list, but it’s always handy to have one or two extra ideas up you sleeve for times when it’s pouring outside or for anyone in warmer climates, when it’s just too hot to play outside.

Sunday Savers

I’ve decided to make Sunday the day I post about what I do around here to save money and cut costs. I need a bit more structure; otherwise this place will turn into a pigsty.

I need to get one thing straight right off the bat. For me frugality isn’t a personal choice. I make ends meet, sometimes barely. I have a nice house by my standards, but then with the house prices at the minute if I sold it I couldn’t afford a house half the size so in that way I’m just lucky.

I’m cheap, tight or frugal; call it whatever you want, because I have to be. If I threw money away on things the bills just wouldn’t get paid. It's that simple really.

I think I’ll start with the small everyday things I do, although please bear with me if I run off on a tangent a lot of these things I do without thinking. A lot of the things I do are green as well. I prefer to be as green as possible at home because my job is sickeningly un-green. Although I’ve never quite figured out whether I do the things because they’re green and saving money is the bonus or vice versa.

I don’t buy any cleaning products, none whatsoever. I do buy a bottle of all purpose soap called Stardrops which costs around 50p for a half litre. You can use this to clean everything from dishes to windows, upholstery to floors and everything else in between. I’ve also been known to buy magic sponges which are £1 for four, but I keep these for specific things, when the Stardrops and elbow grease just hasn’t worked.

I mend clothes from simple things like fixing hems and re-attaching buttons to altering some of toots and my own clothes to get an extra season out of them. I do this every year with jeans for toots. The one thing I will spend a bit of money on is a couple of pairs of jeans from Next. They have an adjustable waist and adjustable leg length so for around £10 a pair she gets an entire year or more out of them. I’ve taken a few pairs up into shorts when there has still been plenty of room left at the waist.

I use old clothes for cleaning clothes.

We always use the library, but I was brought up to use the library. They’re threatened with closing on a regular basis and we need to support local libraries. People keep your kids away from the internet as long as possible and GO TO THE LIBRARY or there may not be one to go to.

I prefer to shop in charity shops. Some people really don’t like the idea of second hand clothes but so many have such a “throw away” attitude to clothing that most of the things I buy have barely done a hands turn. Especially the clothes I buy for toots in fact a fair amount of them still have the shop labels attached.

I spend between £50-60 a month on food shopping.

We grow our own vegetables and have a pear and apple tree as well as a lot of berry bushes.

I keep an emergency food sale fund of around £20 a month. Sales don’t rally follow any pattern here and sometimes a really good bargain just crops up and I’ll use the fund to stock up when I see them.

I am not brand loyal. I rarely buy the same brand of anything, if it’s on sale and I can think of a way to use it, then I’ll have it.

We used washable nappies on toots. I’m not great at sewing and I’m not that dextrous at the best of times, so we went with the shaped Motherease nappies. I bought second hand from Ebay and got a huge batch of 24 nappies, hundreds of paper liners, 12 covers, two small bins with mesh bags and four booster pads. I paid £85 plus £10 postage for the full set and sold them again 18 months later for £70 plus postage. £25 for 18 months worth of nappies was a real bargain. We don’t pay for water here and I did three loads of nappies a week (four in the first few weeks) at around 50p a load.

I don’t make my own laundry soap. It’s virtually impossible to get borax here any more and the homemade soap just doesn’t work without it. I just buy whichever soap is on offer and use a hell of a lot less than what it states on the pack. Most of the time a tablespoon or two works just fine rather than a half cup per load. I also always run a full load, never half loads.

We don’t take holidays. We’ve only had two in the last 10 years.

I don’t drive, never have. I don’t possess a license and I’ve never applied for a provisional. There is nowhere I want to be that I can’t get there under my own steam. We do own a car though. Himself drives for work and at the minute the car gets out once a month for the big shop. We spend around £10 every six weeks on petrol and the car is low emission so the tax is cheaper as well.

There are hundreds more things I do every day and big one off things which I do to save money but I’ll elaborate on these each week.

If I’m missing out on anything I could be doing to save money, and I’m sure I am, I’d love to hear your ideas and tips.

Homemade Vanilla Sugar


This is an easy way to get most out of vanilla pods. Depending on where they are bought they can be quite expensive. I've found that the cheapest place to buy these is at the Asian Supermarket, they're normally around £1.50 for three compared to over £1 for one in any normal supermarket.


I love vanilla, can't get enough of the stuff and when given the option always prefer to use pods instead of essence or extract, although I will use these for day to day things.


I use vanilla to flavour pavlova, whipped cream, custards and ice cream.


The first time I use a vanilla pod I will split it open lengthwise and remove the seeds, using these to flavour a liquid, particularly ice cream, I like the little flecks of black studded through the creamy white of the cream. Some people prefer they're vanilla ice cream to be pristine white, I am not one of those people.


I will then store the pod in an airtight container until the next time I need it which will again be to flavour a liquid. I most often use the pod this time to flavour a cooked custard, adding the pod to the milk or cream in the pan and allowing it to infuse while the custard cooks and thickens. Once the pod has done it's work I quickly rinse it under the tap and leave it somewhere warm to dry out a little.


Once the pod has dried out, measure out enough caster (superfine) sugar for around four recipes, normally about 500g in my house. Whatever your favourite recipes are, the things you make most often and preferably a recipe which contains vanilla.


Add vanilla pod to a blender and pulse until finely chopped, once it doesn't seem to be getting any smaller, add the sugar and pulse again for another 30 seconds or so to distribute the vanilla. Store in an airtight container and use in your favourite cake and cookie recipes in place of regular sugar and vanilla. Feel free to use half and half, vanilla sugar and regular sugar for a just a warm hint of flavour. This can also be used to sweeten coffee, fruit and homemade hot chocolate.


Six or more uses from one vanilla pod at the price I pay brings it down to roughly 8p per recipe. I can live with that, especially when I get a beautifully flavoured dessert.


Times are a bit lean at the minute and the first thing sacrificed is usually desserts. Sometimes a little of what you fancy is good for the heart and can make you feel so much less "hard done by" in times of a tightening budget. A great way to use this sugar and one of my favourite recipes, is rice pudding. I'll be posting a recipe for this very soon.

L.

My Garden - She Provides for Me


One of only three lonely little flowers remain in my garden. The vast majority of space has now been taken over by fruit and vegetables. A few on-edible plants remain, not the flowering variety but still lovely to look at.

It's a tiny little garden really, but perfect nonetheless, in my humble opinion. Is it a little bit mad and overgrown? Well yes it is. But I love it that way to be quite honest.

Tucked away behind the tiny little hedge row, that I'm assured one day will grow to about two feet tall, is my deck. I started it just before a bad car accident. I wasn't too badly injured just some minor whiplash but Himself was put out of commission for months. However I was determined to finish the project which involved digging around five ton of soil out of the first level of the garden and replacing it with roughly the same amount of hardcore then bedding in twelve railway sleepers. This was no easy job mind you but I'm very pleased with the outcome. That was six years ago and I've spent many a happy morning hiding relaxing up there with my coffee and a book. Also it isn't obvious from the picture but the first level is four feet off ground level with a flight of steps running up to it, you can just see the handrail from the steps on the far side of the picture...see over there. Yep those are the ones.


I love lavender and use it all over the house, in baths and showers, drawers and in the bottom of the bin, so you'll hopefully understand and excuse the monster of a lavender smack bang in the middle of the picture.

Anyway, with all the rising costs at the minute, I decided to turn over much of my little garden to plants of the edible variety. I already had the two pear and apple trees planted around four years ago and I've been happily reaping the rewards ever since. Unfortunately, due to some particularly bad weather, in particular some very strong winds, a month or so ago, my little pear tree has been left barren for this year. All of the flowers had already been blown to lord only knows where by the time the brown bees arrived in the garden. She's still beautiful though, fruit or no fruit. That's her in the picture above, all big and green and lush.

It would have been a bit difficult to start removing some of the larger plants already in place to make more room for veggies, so I've given containers a go. I have to say it's working very well so far.

Cute aren't they? The top row are one pot of spinach and two pots of red fire lettuce, the middle row are two pots of rocket and one pot of curly cabbage and the bottom row are another two pots of rocket (Himself got a bit carried away) and another pot of curly cabbage. They've gotten a little bigger since this shot was taken three weeks ago.


Spinach, lovely jubbly.


Red Fire Lettuce


Curly Cabbage...Not so curly I know, but we can't be picky.


So I've gotten a bit carried away and Himself has built a trough type affair for me to add more plants to.

I probably could have done a better job and separating the plants because it does look a bit mad, granted.

I managed to squeeze in, peas, carrots, more cabbage (a different variety, the name escapes me at the minute though) and some dwarf beans, which aren't doing great to be honest

I've plans to head to the market this weekend and pick up some onion sets and potatoes. I'll be emptying the two window boxes in the top picture to use for the onion sets and I'll be planting the potatoes straight into a bag of compost. I'm assured by Gardener's World that this works well. I can poke a few small holes in the bottom of the bag for drainage and prop it up on a couple of broken bricks so that water doesn't collect around the bottom of the bag. I'll let you know if this works or not.
I'm quite proud of myself to be honest, I'm usually a bit ignorant when it comes to gardening and tend to have a brown thumb rather than green. The first thing I check for in the garden centre is whether a plant is hardy (translation = Leanne proof). If it isn't it doesn't make it home with me. But these plants are almost idiot proof, I opened a pack of seeds, shook them into a pot of soil, added water and voila.

I'd love to hear of things you've done in an effort to reduce your food bills at home.