Showing posts with label Tutorials. Show all posts

Girl's Brigade Ribbons - A Quicky Tutorial

It's nearly that time again ... the GB Parade! Everything else is perfectly manageable, the white shoes, the right socks, those awful PE knickers, no problem! Even the ribbons aren't a bother. Ribbons in the hair ... well that's different. Hair and ribbon is like oil and water, the two just don't mix. Even Chloe's mass of curly hair manages to shrug them off in no time. Mothers of straight haired kiddies, I feel your pain. The simple answer is to use a regular bobble or hair elastic and tie the ribbon over it, but the ribbon still falls out and you're left with a bobble which gets you marked down, so I've knocked up a quickie tute for making a ribbon think it's a bobble ... a robble or a bibbon even:)
Click to Enlarge
I went with the collage to save you getting scroll fatigue.
  1. You'll need red and white ribbon in your preferred width, I've used 3/4 inch, and elastic a little bit narrower than your ribbon. I've used a 1/2 inch elastic.
  2. Cut your ribbon into half meter lengths and carefully melt the ends with a match or lighter* to prevent fraying.
  3. Cut a 2 inch length of elastic for each ribbon and again carefully melt the ends. You'll end up with a little singe on these, its just the nature of the material don't worry about it. Fold each length of ribbon in half and use your fingernail to crease the centre.
  4. Measure 2 inches out from the centre crease of your ribbon and, folding the end of the elastic under slightly, pin the elastic in place at each end.
  5. Place one end of the elastic under your machine foot and secure in place with a bar stitch.
  6. Stretch the elastic out in front of your presser foot and with a long stitch length, zig zag stitch to the far end and add another bar stitch to secure. Trim threads.
  7. The elastic will gather the ribbon a little.
  8. Make as many ribbons as you need in whatever colours you happen to need. These will work just as well for things like Irish dancing, gymnastics, whenever you happen to need a ribbon for your girl's hair.
Then just tie the ribbons as you normally would. The idea is that the ends of the elastic should just get caught in the first part of the knot as you stretch to tie it, but not the bow itself. The elastic then tightens and grips onto itself, the ribbon and the hair to stop it falling out every five minutes. *Go easy when melting the ribbons, a bit of discolouration on the elastic is no big whoop but you really want your white ribbons white so go slow, it takes surprisingly little heat to melt ribbon holding it half a centimetre away usually works for me without scorching or discolouring the ribbon. Next up: Matching bow hair clips

************************

New in today

Designer Kindle Case handmade in harlequin cotton featuring a large bird
Kindle Case in Harlequin Aviary

Designer case cover sleeve for kindle, kobo and nook in teal and silver kingfisher fabric
Kindle Case in Kingfisher

Handmade Kindle Case in Designer red floral cotton accented with charcoal grey
Kindle Case in Red and Grey
 

Rose Cuff - The Giveaway

Cast your minds all the way back to Wednesday. Yep this Wednesday. Wednesday, two days ago.

Anyway, way back on Wednesday I posted a wee tute on making one of these absolutely gorgeous (even if I do say so my own self) rose cuffs.


You do remember! Brilliant, well that makes everything all the easier then. Happy days.

Anyway, I also mentioned that I'd be giving away the cuff I made for that tutorial on Friday and given that this is Friday here comes the very difficult, jumping through hoops process of actually entering said giveaway.

All you have to do to be in with a chance of winning this stunning (modest, aren't I) cuff is leave me a comment answering the following question ...

Are you ready?

Prepare yourself now!

Deep breath.


Right, here we go ...

Chocolate or Cake?


I like both if I'm honest and I don't particularly mind if you do too.

I'll pick a number out of the hat that is Random.org next Friday (8th Oct) and get this sumptuous little baby in the post to the winner as quickly as my knackered little legs will carry me.

As with all my giveaways only individuals currently residing in any country on Earth are eligible for entry. So that rules out a few of you;)

You know who you are.

Rose Cuff - A Photo Tutorial

I appreciate that this post will be very photo heavy so I will try my best to keep it as unwordy as possible. The photos should make everything clear, but if you get stuck feel free to either shout at me in the comments or drop me a line at seethewoods at gmail dot com.

I've been making some rose cuffs and after a few requests, I thought it would be easier to just work up a tutorial for the cuff. If you don't know what a rose cuff is, look down ...


Lovely eh?

To make this cuff you will need
  • Two pieces of cotton fabric measuring 11 x 5 inches each
  • One piece of medium weight, sew in Vilene interfacing measuring 11 x 5 inches
  • One piece of bondaweb measuring 11 x 5 inches
  • Approx 5 strips of cotton knit jersey (no lycra or elastane % please) measuring approx 12 x 1 inch
  • Small piece of wool blend felt in green
  • Yarn cut into 5 inch lengths, around 25g of DK will be enough, you'll need more or less depending on whether your yarn is finer or chunkier
  • A selection of shank buttons
  • One larger button measuring approx 1 inch wide
  • Small amount of contrasting yarn
  • Regular sewing thread
  • Silver embroidery thread


Start off by taking each of the strips of jersey and holding each end tightly, stretch them to their full length. The fabric will roll in on itself encasing the raw edges, don't worry it doesn't unravel or fray.


Sew the Vilene onto the wrong side of one piece of cotton about 1/8 inch from the edge all the way around and set it to one side.


Take the Bondaweb and iron onto the right side of the other piece of cotton and remove the backing paper. Start laying one or two strands of yarn at a time on the cotton. Do a couple of inches at a time and press to hold in place with a hot iron. If you are using an acrylic yarn, retain the backing paper from the Bondaweb and place this over the yarn before pressing to protect it.


Top stitch four straight lines across the full length of the cotton using a short stitch. This will secure all the strands of yarn in place.


Now for the roses. Take one length of jersey and starting at one end coil it around between your thumb and forefinger making sure that the rolled edges of the jersey are on the inside of the coil.

I like to start each cuff with one large central rose. You can check it against the cuff and continue coiling until you're happy with the size.


Snip off any excess jersey and set to one side for smaller buds. Decide which side of your rose will face upwards (one side always looks better than the other) and turn the end of the strip to the underside of the rose.

Fasten the end in place with a few stitches using regular sewing thread and then continue to back stitch across the width of the rose securing each ring of the coil to the one next to it and so on.


Carry on making roses of various sizes and placing them on the cuff until you're happy with the the layout.


Next take the small piece of green felt and cut out a few small leaf shapes, you can make them as big or small as you like. I think five little ones looks nice.


Transfer your rose design off the cuff and starting with the centre rose begin to stitch each rose in place using a sharp needle and the silver embroidery thread*. Draw each stitch quite tight into the jersey. It will pull in sections of the rose giving it more texture and definition making it look more like a rose. Try and catch each ring of the coil with at least 3-4 stitches not forgetting to tuck those little leaves in and secure them with a few stitches too.


Next comes the buttons. Wedge the shank of the buttons down in between the roses and secure in place with regular sewing thread.


You could leave it at that, but I like to add a few stitches in contrasting yarn (I've chosen lambs wool here) in between and around the roses.


Again taking some of the contrasting yarn, make a loop for fastening the cuff by casting 25 sts onto 4mm needles and without knitting any rows, cast the stitches off again. Secure both ends together and trim away the excess yarn.

If knitting isn't your thing you could braid 3 lengths of yarn together or just use a length of cord or ribbon making sure that the loop is large enough to pass your large button through.


Now to pin everything in place. Start by placing the loop with the knotted end sticking out at one end of the right side of the cuff and pin in place. With right sides together continue pinning all the way around. The roses in the centre of the cuff will make it balloon out slightly in the middle but just make sure the edges are matched and pinned and it will all come good.


Sew around the cuff 1/2 inch from the edge, not forgetting to leave a 2 inch gap for turning on the short edge opposite the end with the yarn loop. Stitch back and forth over the yarn loop 2-3 times to secure and back stitch at either side of the turning gap. It can be a bit of a wiggle to turn these and you don't want to start pulling stitches out.

Clip the corners of the cuff, but leave the excess in place around the edges.


Turn the cuff through so that right sides are facing out and press on the reverse with a hot iron. Pin the edges in at the turning gap, pin in place and press again with the iron.


Back to the sewing machine and top stitch along the short edge only to close the turning gap. You can hand sew this closed if you prefer.


Finally wrap the cuff around your wrist and place the large button for fastening. Sew this securely in place on the cuff and you're all done.


Of course if all that is just too much hassle you could treat yourself to a ready made cuff from my shop or, if you can make your way back here again on Friday, I'll be holding a giveaway for this lovely yellow one.

*I like to use silver because the jersey has a bit of sheen to it and even when I use thread which matches perfectly it sticks out like a sore thumb because it reflects the light differently. I figure if the stitches are going to be visible, they might just as well be pretty.

And speaking of cushions.....

I've finally finished the first batch of new cushions for me:) They're mine, all mine.


It feels like an eternity since I've made something for myself so I'm a teensy weensy wee bit precious about these cushions.

Husbands who arrive home from work, kick off their nasty work boots and fling themselves onto the sofa feet and all, not to mention 4 year olds who will still occasionally wipe a stray booger on anything unlucky enough to be within arms length are in very real danger of winding up on the endangered species list, if you get me.

I've been meaning to make these for, ooh a couple of months now, isn't it amazing how easily time gets away from you, and yet what it all boiled down to was an hour or so on Thursday evening pressing and cutting the fabric and a very thoroughly interrupted 90 minutes this morning and I have six completed new cushions, plus two more covers ready to be filled.

I already looked like a mad bag lady carrying six of the inserts home on Wednesday, adding the last two would have been just pure insanity. Plus I can always collect them on Monday.

In the end I went for simple envelope cushion covers because in this house zips tend to get broken and I figure they'll last a heck of a lot longer this way.

In case it isn't immediately obvious from the photo the cushions are a pale buttermilk yellow and a soft pistachio green which are conveniently enough the very same colours I've chosen to repaint the living room eventually.

So I'm moving ever closer to my cosy welcoming home and so far I'm managing to stick to my very tight budget because I saved a bundle on the fabric.

Because my local fabric shop also carries out a curtain making service when a new print arrives in one of the seamstresses whips up a curtain so that it can be hung to display the fabric properly, but because of the limited space they only do this with the most expensive fabrics, then once they either decide they won't be reordering any more of that print or it becomes an end of line print, the curtains are taken down and popped in behind the counter out of sight.

However if you know they're there you can buy them for £3 each! Each curtain is roughly two yards of fabric and both of those prints originally sold for £22.99 per yard. Picture me with the big grin on my face. Add to that the fact I found 300 thread count heavy weight cotton sheets on sale in Makro for £6 and my new covers ended up costing me a little more than £1 each and I still have a little more than half the fabric left.

I did spend a bit more on the inserts though, but I opted for the ones that love the washing machine and tumble dryer. I have the same pillows on my bed and they've lasted years so I really can't fault them. I'd much rather spend the extra now, than end up replacing crappy inserts every few months.

I'm also working on a little something for Chloe's room at the minute which is turning out to be just about one of the cutest things I've ever set eyes on. I'm taking my time though, because I will be posting a tute once it's complete.

Tutorial - Homemade Poi for Kids

At the very real risk of being labelled internet wide as a terrible mummy, I'm going to give you a tutorial on how to make your kids homemade poi.

Poi are used often in performance arts and a friend of mine got me hooked on them years ago but, as with most things in life, where it can be very difficult for an adult to learn to use them kids master them in a matter of days.

I still try as often as the weather permits to get into the garden with a set because using poi is a fantastic form of exercise and is also great for developing coordination, balance and grace, three things which I sometimes lack. I also found that when I worked as a secretary, spending hours chained to a pc typing left me with very stiff, sore wrists and poi swinging helped to ease and soften the muscles and get rid of the cramps.

So, to make a set of poi for you kids (or for yourself) you'll need the following;


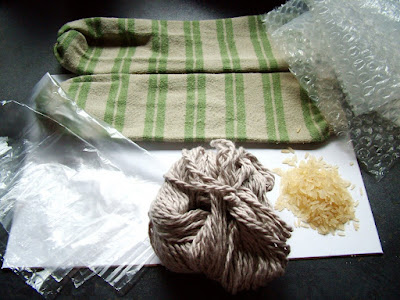
A pair of old socks (kids knee length or regular adult size ankle length will do)*
Two sandwich bags or small cheapy plastic bags.
60g of rice
Some bubble wrap (old towelling or fleece will work too)
Elastic bands or regular kitchen string.

The first thing you need to do is take a measurement. If these are for a child take a measurement from their underarm to their wrist, for an adult measure from the fingertips to the shoulder. If, like mine, your child doesn't fancy standing still while you take the measurement just use a well fitting coat or jumper to get the right length.

Keep a note of the measurement (mine happened to be 10 inches). Then measure out exactly 30 grams of rice into each of the two plastic bags. You do need to be precise about the weight because even a gram or two can throw off the balance.**


Then tie a knot in each bag a couple of inches away from the rice. Don't compact the rice into a ball and tie the knot close to it, the point is to allow the rice to move around as freely as possible inside the bag.


Next take a square of bubble wrap or soft cloth and pinch the four corners together around the bag of rice, again not compacting the rice in any way. My square of bubble wrap was 6in X 6in.


And then place the bag in the toe of the sock.


Hold the sock in your hand and give it a good shake to make sure the bag of rice is well seated in the bottom of the sock.


Then taking an elastic band or a piece of string wrap or tie it around the sock about an inch above the rice bag.


You can see that there is still plenty of give in the ball end of the sock.


Next take the poi along with your measurement. Its easier to set a ruler or tape measure down, rather than trying to eyeball it.


And stretch the sock out to its fullest and make a note of the measurement on the sock (easy with mine because of the stripes). You really need to stretch the sock as far as it will go because it will stretch when spun and you don't want it getting a couple of inches longer all of a sudden mid flight (trust me, learnt that lesson the hard way).


Then just tie a knot at the measurement mark when stretched and you're done. Once the sock has relaxed back to its original length it will look very short, but it will stretch to the full length at some point during spinning so it really is better to be safe with this one.


Repeat the steps again for the second poi and you're ready to go.


Start by learning to spin the poi forwards, once you're completely comfortable with that then begin to spin them backwards.

You can then move on to split time swinging, chasing the sun, the windmill (which I totally rock btw) and loads and loads more.

The trick to teaching kids to swing poi is to teach them to keep their arms straight. That's it, it really is that simple. If you follow the instructions above and your child keeps their arms straight regardless of where their arms are positioned, its quite difficult for them to hit themselves with the poi. You also want the child to hold the knot while spinning the poi. You can also make sure the knot is pulled tight and then cut away any excess fabric.

*I didn't use a pair of socks because I happened to have a pair of Toots old skater sleeves lying around. It meant that I had to sew one end of the sleeves closed, but if you use socks you don't have to bother with this step and don't worry that the heel makes them look a funny shape, they still work the same way and swing straight.

**There are some instructions around which suggest using crumpled up plastic bags or cotton wool to stuff the ball end. Please feel free to do this if the thought of rice or lentils concerns you. I've tried a few different methods and have just found that the rice works best. The poi seem to work better and are less likely to go off track or get caught by the wind when there is a bit of weight at the end of the poi.


What I do it add the weight, but I make sure that it is "soft weight". Made this way, even if the poi does happen to hit you the weight isn't solid so it gives and flattens. Toots and I have hit ourselves with these a few times but never hurt or even bruised ourselves with them.

Easy Craft for Kids - The Rain Stick

Rain sticks are a great, easy and cheap kid's craft project.

You'll need to gather together the following for a basic rain stick;

Cardboard tube
Scrapbook paper or wrapping paper.
Sticky tape
Scissors
a piece of cardboard
rice or dried lentils


Start by cutting two strips of cardboard and two discs of card roughly the same size as the ends of your tube. The strips need to fit inside your cardboard tube, mine are about an inch wide. Concertina the strips of cardboard.


Place one card circle over the end of the tube and tape it firmly in place.


Turn the tube over and push the two strips of card into the tube and pour in the rice or lentils (the bigger the grains the bigger the "rain")


Place the other card circle over the open end and tape in place to close the tube.


Then cover the entire tube with pretty paper.


Fold the paper in over the ends and tape in place. Mine came up a little short. That's what I get for being too lazy to cut the tube down to fit the paper.


I had some craft foam stickers so I covered up the raggedy ends.


And that's you finished. Except we all know I'm all about the embellishments. While Toots busied herself covering the rain stick in balloon stickers, I made a little pompom wrist strap.

I threaded felt pompoms on to a length of embroidery thread using all six strands and then tied the two ends together.


I then threaded the ends of embroidery thread under a fold in the paper at one end of the tube and taped over it, adding a few feather to hold everything in place and covered up any little tears in the paper.


Then you're finished. And hopefully you have a happy child into the bargain.


If you want (or need, don't worry you're in understanding company) a great craft fix head over to Make and Tell Monday at The 6 o'clock Stitch.